Uploading guitar videos to the vast video web of YouTube can be a very satisfying hobby. With that said, many guitar YouTubers make a full-time living creating, entertaining and informing the web with everything music and guitar!
Whatever your content maybe? Cover videos, teaching tutorials, reviewing the latest gear, or rambling to the web about the latest news and topics.
Acquiring more views on your videos thus growing your channel, will require you to upload polished and professional videos for viewers to enjoy.
If you’re a complete beginner to the production process. You’re in luck! This post will outline everything you need to know with useful hints and tips when creating a professional guitar video for YouTube.
To begin, let’s discuss how you should correctly record your guitar.
How to Record Guitar for YouTube Videos
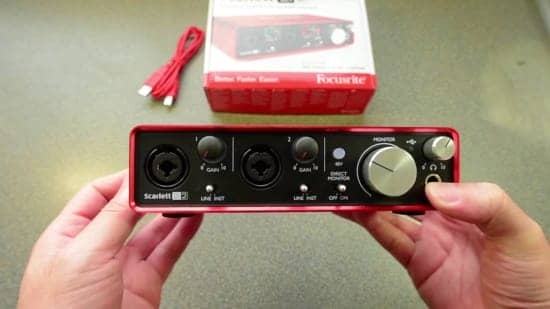
First off, if you want to get serious with recording, an ‘audio interface’ is a must-have investment. There’s no way around it. Whether it’s recording guitar, bass, or vocals, it is essentially the capturing hub of your recording endeavors.
An audio interface works by capturing your guitars analog signal and converting it to a digital waveform for recording within a ‘DAW‘ (Digital Audio Workstation).
The DAW is your designated audio software, that allows for editing, mixing, exporting and further audio manipulation.
Technically, there are are other methods to record guitar without an interface. However, I’m not going to recommend them here.
If you’re considering recording instruments without some form of external sound card, just don’t! Mainly due to the poor sound quality and latency you will later discover.
There is no guitar recording method I will recommend without an interface, so I highly recommend the investment if you do not have a device already.
Which Type of Interface?
There are many types of audio interfaces on the market: USB, Firewire and Thunderbolt, but the one I recommend is a USB interface.
Mainly because they are inexpensive ($80-$150), compatible with nearly all PC hardware/software and ideal for beginners getting started.
Once you have an interface, it’s as easy as plugging in, downloading the drivers, connecting your guitar and away you go. There’s no difference in sound quality between connection types of interfaces (USB, Firewire, Thunderbolt), which you can read why here.
If you currently don’t have an interface. I have an awesome in-depth post you can read here, on the best affordable USB interfaces I recommended that are perfect for recording guitar.
Best Methods for Recording Guitar!
Once armed with an audio interface, you will need to decide which method you will use to record the guitar. There are two common ways of recording guitar, both with their pros and cons which I’ll explain in just a second.
Either method is great viable ways to record. They come down to budget, preference and available hardware. If you have the gear, experiment with both and see what works for you.
Recording Guitar by Direct Recording

The first method is known as ‘direct recording’ or ‘DI’ing’. Which is simply when the guitar’s signal is sent through the guitar cable and directly to the audio interface, which is then processed and converted to a digital signal on your PC.
The digital signal can then be modeled within your PC using amp simulation software, or any desired plugin. Supplying you with a vast selection of realistic sounding tones from simulated amplifiers, pedals, effects, reverb etc.
Why Record Guitars Direct?
Personally, I use the direct method for recording guitar due to its convenience, versatility and sound quality but that’s not to say the other method isn’t as viable either.
The main advantage to the direct method is that the signal does not pass through the air, meaning that it cannot be hampered by external factors such as room size, background noises or amp buzz causing signal degradation.
It’s also the easiest and most convenient way to record. Without having to worry about miking the amp and fiddling around with microphone placement on the cabinet.
Proper microphone placement requires a whole separate article altogether. You also have the added benefit of recording silently with headphones, without annoying any residents or neighbors.
Why use Amp Simulators?
A major plus for amp sims is also the level of tonal customization that’s on offer. I currently use Guitar Rig 5 and Amplitube 4 that allows me with a click of a mouse, get a heavy sounding ‘Mesa Boogie’ preset or a sparkly clean ‘Fender Twin Reverb’ tone which sounds very close to the real thing.
You can also add pedals, reverb, delays, effects, tweak heads, tweak cabinets, re-position miks, change the recording room. Basically it’s fricken awesome!
What I’m saying is the tonal versatility is endless meaning you do not have to buy a ton of hardware including amps and expensive gear to record your desired tone. Some of the current best-paid amp simulators available are:
- Amplitube 4
- Guitar Rig 5 Pro
- Bias FX
- Thermionik
- Schuffham S Gear
Another cool thing about recording direct with amp sims, is once your guitar signal is recorded in your DAW, you can customize the sound and tone in ‘real time’ meaning you can listen back to what you played and tweak the tone during playback.
Whereas, if you were recording your physical amp and did not like how it was sounding during playback (even with some heavy EQ), you would have to go back, tweak the amps EQ and re-record again!
The Cons of Recording Direct!
The only negative with amp simulators is that the paid ones although are great, they can be pricey depending on the amp sim you choose.
However, available on the web are free amp sims such as LePou Amp Suite, and Ignite Amps which sound great but can only be used as plugins and are not at the level of customization and features of the paid programs.
The debate also continues among ‘keyboard warriors’ via forums that amps sims don’t feel and respond similarly to a physical tube amp. I must admit this is true, but this is generally the standard drawback to modeling software compared to analog.
Another negative is that amps sims can sound a tad on the digital side with producers having trouble mixing with them. For convenience and versatility sake though, you can’t deny how easy it is to get the sound you are after with plugins and amp sims.
Record an Amplifier with a Microphone

The other method is the good old fashioned way, by recording your physical amplifier with a microphone, usually a dynamic microphone.
It is difficult to argue that a good valve amp, connected to a quality cabinet, placed correctly with a good microphone in a good room, will sound killer! Using this method of recording, however, does come with the small price of impracticality.
Depending on what amplifier you have solid state or tube, you will want to place a microphone on the ‘sweetspot’ of the speaker using an XLR cable connected to the audio interface.
The axis, the characteristics and the position of the microphone and the acoustics of the room will influence the sound and dynamics of the tone. You will need to learn the importance of microphone placement and how this shapes and sculpts tone.
Which Microphones?
The best and most popular dynamic microphones for recording guitar are the Shure SM57, Sennhesier MD421 and the Sennhesier e609 which have all stood the test of time in the recording industry.
This method will be more time consuming setting up, testing and readjusting the microphone to achieve the sound you want. I can go into much depth about microphone positioning and how it affects the sound, but this video explains it nicely.
Another issue to consider on this method depends on your amp, if you want to record high gain saturated tones with a solid state, then no problem this can be done at bedroom levels.
However, if you have a tube amp without an internal attenuator that can lower the wattage, then this may be an issue for you, or should I say anyone that lives in close proximity.
Keep in mind, a tube amp that is 15 Watts and above, is going to get loud to achieve a high gain saturated tone! This will make you the least popular person with family, roommates and neighbors. An option is to purchase an external attenuator that can quiet your amp whilst still producing saturated tones, but this will add more expense.
External attenuators have also received a bad rep for ‘wearing out’ tubes and causing the dynamics to dampen. If you live alone or on a remote farm, with an amplifier and pedals that you love the sound and tone, by all means do it. You will learn a lot about dynamics and learn to train your ear.
Here’s a great video that sums up the pros and cons of recording guitar direct vs microphone!
How to NOT Record Guitar
Do not use the videos audio file, whether it’s from a video camera, a phone or potato. The sound quality will be garbage and people will instantly click off your video. It’s the 21st-century use one of the methods above.
Do not use the method of connecting your guitar into your PC’s internal audio sound card using a 3.5mm adapter.
The pre-amps are useless, you will have latency issues, the signal to audio level will be worthless no matter what plug-ins/VST’s you add. Invest in an audio interface if you want to get serious about recording.
Do not record an amplifier with a dynamic microphone only to connect to your PC’s sound card, (for the same reasons above).
Do not connect your amplifier head to your PC (especially a valve amp) only connect it to a speaker cabinet, YOU WILL BLOW YOUR AMP.
Record Guitar with a DAW
For recording, editing adding effects, using plugins and mixing your recordings, you will need a DAW that’s up to scratch.
Anyone new to music production will make a difficult decision when choosing a DAW, with the vast amount of paid and free programs to choose from.
The Best Paid DAW for Recording

Most free DAWs are ok for basic editing and recording, however, it won’t take long to realize that most free DAW’s have limited features. Meaning you will be searching for a paid program in no time. Luckily, Mac users have Garageband as stock which covers them to a degree, the Windows users, unfortunately, do not have this luxury.
Go with Reaper
If you currently don’t have a paid DAW, to prevent you searching and saving you a ton of time, I’m going to make the bold statement that the best-paid value for money DAW, hands down goes to Reaper.
I could go into much detail about how great Reaper is, and judging by its popularity I’m not alone, but luckily I’m keeping this short and sweet.
First off, I’m not affiliated with Reaper so this recommendation is genuine and honest.
Now with that out the way let’s start with the price, as of writing this Reaper only costs $60 for a discount license which is far less than most recording Software.
Don’t let the word “discount” fool you, this license gives you full access to all of Reapers features which is more than enough for beginners and intermediates and even advanced users. Here are the Main features:
- Easily record audio and MIDI
- Edit, import, export audio
- Unlimited inputs
- Simple to use
- Customize appearance and menus
- Full VST and plugin support
- Great built-in effects
- Available for PC/Mac/Linux
- Runs fast as it’s light on CPU usage
Reaper has a thriving active community on the official forum with technical support and tutorials to get you up and running. There are also many YouTube video tutorials to get you covering the basics in no time.
The only cons with Reaper are it doesn’t come with any libraries for things like beats and sound samples.
However, I’m assuming you’re only looking to recording instruments like guitar, vocals, and bass and not aspiring to create the next banging rap or dance record (get Fruity Loops for that). Regardless you can add your own sound libraries if you wish which is not an issue.
The Best Free DAW for Recording
If you wish to test the water still with free software then no problem, here’s a selection of the best free DAWs I recommend to download to dip your toe and get started immediately.
Zynewave Podium (PC)
Zynewave Podium is a free DAW that supports multi-track recording, MIDI devices and supports additional VSTs. The amount of effects is limited due to the programme using only one CPU core for processing. No registration is needed for download which makes this software great for basic home recording.
Audacity (PC/Mac)
Audacity is one of the most popular free DAW which has a simple interface which allows users to edit audio with a good amount of editing tools. You can record two tracks at once using stereo recording.
Unfortunately, Audacity does not support any virtual instruments meaning that you cannot use any amp simulation software such as Amplitube or Guitar Rig as plug-ins.
Secondly, there is no real time compression or EQ playback which means audacity is best suited for small projects and simple audio editing but is good for beginners getting started.
Pro Tools First (PC/Mac)
Pro Tools First is a free, minimalist version of the popular paid version of Pro tools which is used and highly regarded in the professional recording industry.
This version includes 16 tracks for one project, 4 inputs for recording, 20 standard plug-ins and a maximum of 3 projects which have to be stored on a cloud service. MIDI is supported for external instruments and virtual instruments (VST’s) can be imported so Amplitube, Guitar Rig or any other amp simulation program can be used.
Garageband (Mac)
Mac users have Garageband which is a simple and use to use DAW that comes with all the necessary features for recording, editing, mixing, adding effects, with great MIDI and VST support. You can create some professional recordings with this software as there are easily enough features here for the Mac users.
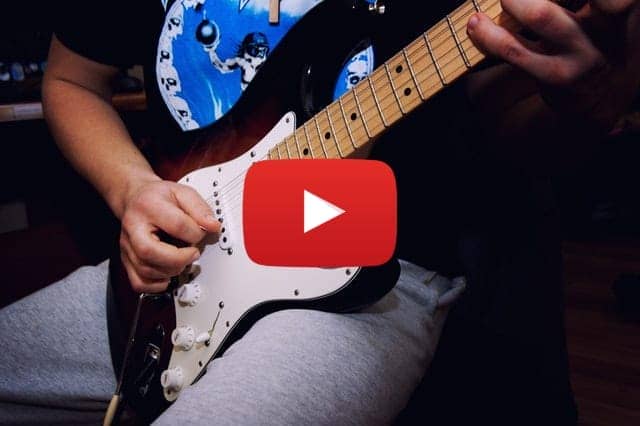
How to Film a Guitar Video
When it comes to capturing footage it does not have to be complicated, you will want anything that captures full HD ‘1080p‘ which is achievable by most video capturing devices. A camcorder would be the ideal option as they are more suited to video capture.
You could also record using mobile as long as the video capture is high enough quality. It’s worth noting a mid-spec camcorder will offer higher quality video capture than any high-end compact camera.
A must-have feature though is a viewfinder, which will make the recording process less tedious as you can get into position and view the shot for feedback before recording the performance.
I’ve tried recording with a compact camera in the past without a viewfinder and it was a tedious process having to re-record due to the shot not being right.
Another recommendation is to use a tripod for the camera as you can easily achieve better angles and brings the production quality up a notch making the recording process less tedious.
Get Some Sick Angles!
Make sure you get some good angles of the fretboard, headstock, and close-ups of the guitar which will give your video a professional cinematic look. This all depends on your room layout and lighting, so just play around and see what works the best.
For the best video quality make sure you are recording in a room that has good indoor lighting and lots of natural sunlight.
Some fancy YouTube videos have multiple angles of the guitar in the video, giving the illusion that the performance was recorded with multiple cameras.
This technique is achieved by recording multiple takes at different positions and editing them all together which adds an extra element to the video.
Best Free Video Editing Software
For basics video editing, there are a number of free programs for download with the required features for making professional looking videos. There’s no need for expensive, complicated and professional editing software for simple video editing.
However, you will need a program that allows for importing, editing, trimming, audio matching and the option to export videos at the recommended format (MP4) which is optimal for YouTube. The programs I recommend are based around the criteria of:
- Free
- Simple to use
- All necessary editing features
- Supported formats
DaVinci Resolve (Win/Mac) (Recommended)
This free editing software is a simple, easy to use giving you all the tools to create a professional video.
This program is a direct competitor to Hit Film Express without all the fancy special effects. This software focuses more on color grading with advanced tools to enhance the color display of videos.
There is a large selection of editing tools and features which are solid and simple and in my opinion, easier to use with a less cluttered interface than Hit Film Express.
There is an option to directly upload to YouTube which makes the package more consumer friendly. This software is great for beginners looking to make a professional video without all the unnecessary clutter.
Hit Film Express (Win/Mac)
This editing program is packed full of features as it is an editor and compositor (for visual effects) which is capable of creating very professional videos.
Hit Film Express comes with an intuitive, easy to navigate interface which can be customized. There are over 180 visual effects including transitions with an unlimited amount of tracks if your computer can handle it.
Hit Film Express is also social media friendly, as there’s an option to directly upload your project to YouTube which is a nice feature. However, you will need a fairly powerful computer as the software runs slow, therefore rendering will take a while especially if using 4K.
Secondly, the software is prone to crashing but will recover projects if this happens. This software is a good option for the filmmaker looking to create larger projects in the future. However, if you are only looking to produce short, simple videos then DaVinci Resolve maybe a better choice.
IMovie (Mac)
IMovie is a stock video editing application for Mac users that has a simple interface and includes all the required features to make a professional looking video. This software supports firewire for high-quality videos and is the best choice for free video editing for Mac users.
Recording the Guitar in a DAW
Now our hardware and software are taken care of, it’s time to record your guitar. Whatever method you decide to record (either directly or recording an amp) the first thing to do is configure your audio interface within your chosen DAW.
This ensures that your interface and software are communicating effectively and the software is receiving the guitars line level input for recording.
First, check that you have the latest drivers installed supporting your interface, go into your DAW and ensure that your audio interface is the main device with ASIO and the inputs and outputs are configured. It will look slightly different with most programs but here’s how it looks through Reaper.

However, you choose to record, (amp simulators or your microphone) you will need to create a new project and add a ‘mono’ track. Play the guitar and you should be able to see a signal coming through the software.
Adjust the interfaces gain and the DAWs mixer volume to ensure the signal is strong enough for recording but not excessive enough to cause clipping known as ‘gain staging’.
Some DAWs will require you to enable to the ‘monitor’ button to hear back the guitars through your PC’s speakers. All that’s left is to arm the track and press record and away you go. Obviously, make sure you have a video camera set up capturing the footage while you record the guitar.

Once the guitar part is down, to improve the mix you could double track the guitars and pan them left and right to make them sound wider. I could go into much detail about adding EQ, compression, reverb, delays and mixing techniques to enhance the mix and sound of your projects.
However, this post is long enough as it is, so I’m saving it for another article. When you are happy with the recording, export your projects audio to a file format (Mp3) which will be imported to the video editing software for syncing with your captured video footage.
Sync the Audio and Video

When you have recorded the audio and uploaded the footage to your PC, in your preferred editing software you will need to import the audio and video to the designated timeline. All that’s left to do is match both the audio and video waveforms to create a smooth final video.
To manually do this, in the timeline you will match the audio waveforms of each recording making slight adjustments to get them matched up perfectly.
DaVinic Resolve has an auto-syncing feature which means you don’t have to this manually which is a very useful feature. Remember to mute the video files audio as you will only want to hear the audio track you recorded in your DAW.
Export Video
Once the recording audio is matched with the footage and everything is edited and looking professional, you will then need to export the project to a file format. There are a number of file formats that YouTube supports but the best formats that are recommended for the best YouTube video quality are:
- Container: MP4 (file format uploaded to YouTube)
- Audio codec: AAC
- Video codec: H.264
- Resolution: same as video
- Frame rate: same as video
It’s worth noting if the video files size is too big (maximum amount is 2GB), YouTube will compress the file to allow the upload.
However, every time a video is compressed you will lose a noticeable amount of video and audio quality so the least amount of compressions or none would be ideal. When the video is exported it’s and looking good, it’s time to upload to YouTube.
YouTube Tips for Guitar Videos
Create High-Quality Content
If you are looking to create a new channel and have a presence in the YouTube world, then professional, entertaining and original videos are going to want to make people watch, share and subscribe helping you grow your channel.
I have noticed that guitar videos with the most views are the videos that have the ‘viral factor’. For example, I have seen videos that have millions of views with a tiny amount of subscribers, these are the videos that come up with an original, interesting and appealing idea for video content.
Videos that are based around a new, original idea that is intriguing, appealing and entertaining are more likely to be watched and shared resulting in more views and subscribers.
This is not to say cover songs will not get views as these are still popular, as long as they are produced to a high standard. Whatever your content is going to include it can be anything from:
- Guitar cover videos
- Lessons and tutorials
- Gear reviews and demos
- Unboxing videos
- Latest news and topics
Create a YouTube Thumbnail for your Video
When an individual searches on YouTube and stumbles upon a selection of videos to watch (one of them being your video), you want to ensure that your thumbnail looks eye-catching, interesting and entertaining to watch (accompanied with an interesting title).
Your video is competing with a sea of other videos, so having a professional thumbnail with bold, colorful text with an interesting background will entice users to click on your video amounting to more views.
You can easily create custom thumbnails for free at Canva which is a graphic design photo editing website without needing any advanced graphic design knowledge.
Conclusion
Creating guitar videos is a fun and enjoyable past time as you capture and submerse yourself in the creative process, but learning the ropes can be difficult especially if you’re a beginner and new to recording.
This article has hopefully informed and given you the basic guidelines for creating with some good resources thrown in there to get you started with recording right away. If you liked the post, be sure to leave a comment!