Do you want to record your effect pedals direct using your audio interface? But not sure how to go about it?
This post is a how-to guide on setting up your guitar pedals or multi-effects with an audio interface and DAW for recording.
Whether it’s to record your entire pedalboard? Or to add your favorite pedals combined with an amp simulator?
This post has you covered! Let’s dive in…
How to Connect and Record your Pedals
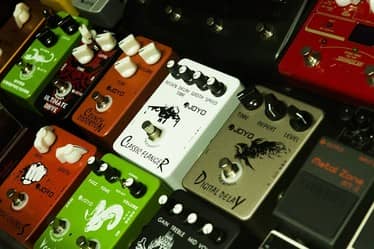
- Make sure pedals ordered correctly based on pedal order guidelines and personal tastes
- Connect your ¼ jack into your guitar with the other end to your pedals and lastly into the audio interface
- Test the input signal levels on your audio interface by playing some chords
- Load up your DAW (recording software) ensuring that the channels are correctly mapped out
- Test the input level of the DAW’s interface by playing some chords ensuring the levels are not exceeding 0- (clipping)
- Adjust the input gain on the audio interface or DAW’s slider to ensure the level is loud enough for recording but not clipping
- Make adjustments to your pedals knobs to adjust tone and input volume
- Decide if you want to record your pedals dry or engage a cabinet simulator or amp simulator plugin for more realism
- Do a final tone and level test when you are happy with your sound
- Hit record and play!
Let’s say that again but with more detail…
1. Order Your Pedals Correctly
Whether you’re playing or recording music, it’s essential to know how to arrange your pedals in the signal chain.
But although there are no strict rules for this, there are some guidelines to follow if you want to keep your tone as clean as possible for recording.
If you only want to record one or two effect pedals, then there’s no need to get fussy.
However, if you want to record a medium to large pedalboard, then pedal order does matter.
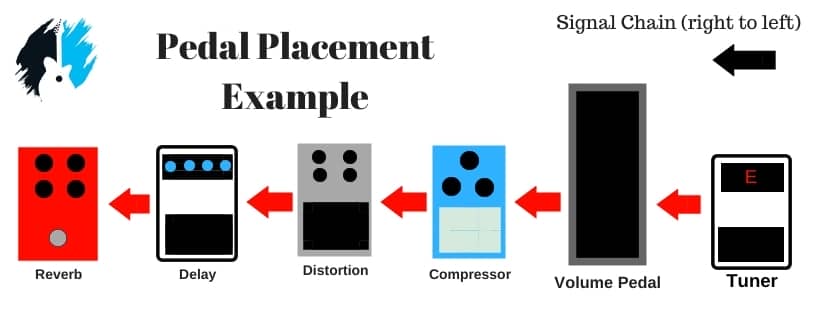
Going from guitar to the audio interface, it should be like this: wah, EQ, compressors, pitch shifter/octaver, distortion/overdrive, chorus/flanger/phaser, delay, and reverb.
Simply arrange your guitar pedals based on basic pedal order guidelines and your tonal preferences.
2. Daisy Chain your Pedals to your Audio Interface

With your ¼ jack connected to your guitar, connect the other end to your pedals.
Daisy chain the rest of your pedals together as you would typically use the correct inputs and outputs. The end of the chain will connect to the audio interface.
Any audio interface for instrument recording should have a standard 1/4-inch jack.
If you still without a device, the Focusrite Scarlett 2i2 3rd Gen (Reverb.com) is regarded as the best audio interface for professional recording at an affordable price.
3. Check Input Levels on your Audio Interface
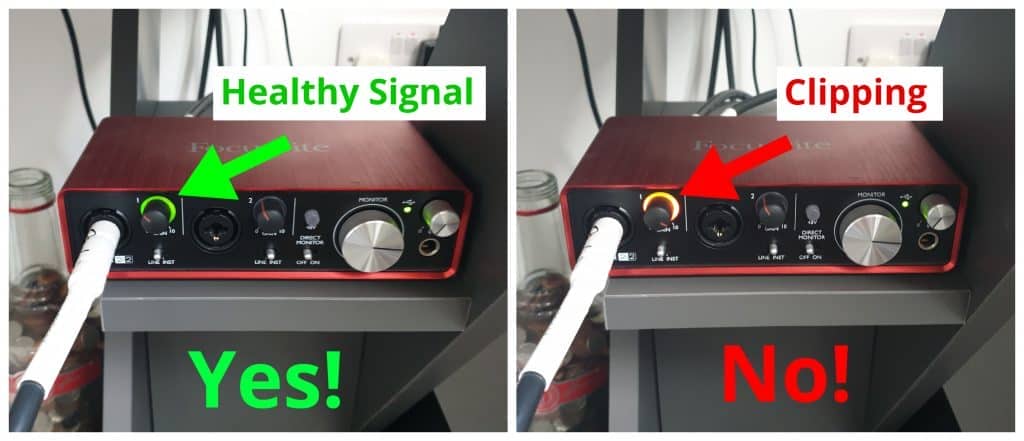
The next step is to play some chords on your guitar and check the audio interface input levels. This is to test the input level strength.
Too much gain will cause the signal to distort and clip hampering the signal quality. To counter this, lower the gain on the audio interface.
On the other hand, a weak signal is not ideal for recording, requiring you to adjust with additional gain.
The perfect signal level is just enough gain before you start to clip with enough breathing room. This ensures a strong and prominent signal for recording.
If you have a good audio interface, it should include LED indicator displaying signal strength. The indicator should also display when a signal is clipping.
4. Open your Recording Software
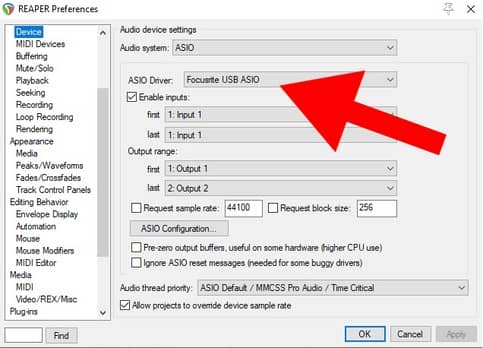
The next thing you’ll need to do is to open up the DAW (Digital Audio Workstation) on your computer. (Here I am using Reaper.)
Make sure that your sound card’s channels (or one channel) are mapped out and configured correctly with your DAW.
5. Create a New Track and Test Input Levels
The next thing you’ll need to do is to check whether there’s any clipping in your DAW’s mixer.
First, create a new mono track on your DAW and ensure you have turned on the monitor button on your guitar input individual channel.
This is the only way you’ll be able to hear your tone through the speakers when playing and recording.
Now play some chords, the signal should not pass its designated 0 dB mark. Otherwise, you risk having a very messy-sounding tone.
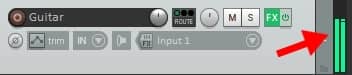
If the gain metres are exceeding 0 dB you have the choice of lowering the channels input gain using the slider or lower the input on your audio interface.
6. Ensure the recording levels have enough volume
At the same time, your levels also shouldn’t be too low. After all, you need to hear your guitar in the mix.
Again, open your DAW’s mixer and make sure that the signal levels are at a desirable level.
If not, then add more gain on your audio interface or individual DAW channels.
7. Make adjustments to your pedals to shape your ideal tone
Now that the levels are all set up, start shaping your tone the way you want it to sound.
Bear in mind that your guitar pedals won’t sound the same like on your amp when playing through an audio interface.
It’s also a good idea to take a photo of your settings when you find the desired tone.
This, however, might be a little tricky. By adjusting your guitar tone, you might push the levels too high and will see the signal clipping either on your audio interface’s indicator or in your DAW.
You’ll need to go back and forth and set your tone while taking care of your levels.
8. Enable A Cab or Amp Simulator (Optional)
Decide if you want to record your pedals dry or use a cab simulator or full amp simulator for more realism.
Having an amp simulator allows for an authentic bottom end, allowing your tone to react similarly to a physical guitar amp.
Need an Amp Simulator?
I have an epic post you should check out called… ‘The 16 Best Amp Simulators (Free & Paid)’ for my ultimate round-up of the best amp sim plugins available right now.
9. Do a Final Level Check
Now that you have dialed in a sweet guitar tone. Play some chords and noodle about checking that the levels are at the correct level.
10. Hit Record and Play
All there’s left to do now is to hit the record button and play.
When you’re finished recording what you intended and want to hear how it turned out, switch off the monitoring on your guitar’s individual channel in the DAW, move the cursor to the start of your recorded track, and press play.
The Final Result (Watch Video Below)
As you can see from the video, I simply followed the steps above for a sweet recording of my screaming fuzz pedal.
It was pretty simple. I used an amp simulator (Guitar Rig 4) within Reaper as my foundation sound.
Within the software, I chose a Fender amp for a sweet vintage-style tone. I also used a compressor and a touch of spring reverb in Guitar Rig for the icing on the cake.
For the dirt section, I wasn’t impressed by any of the fuzz pedals within the amp sim. Therefore…I used my own!
I have always loved my “Fuxx Fuzz” pedal, so I simply dropped it into the signal path using the steps outlined above.
As you can hear, it sounds awesome and was happy with the final guitar tone. So go ahead, record some of your pedals, and experiment with different sounds.
View My Next Post

Like this informative guide? Check out my related post…
“Can Guitar Pedals Be Used for Bass?”
Learn why guitar pedals are just as effective as bass specific pedals for sweet bass tones!
Using Effect Pedals With an Amp Simulator
When recording guitar through an audio interface, it’s always a good idea to use one of the amp simulator plugins in your DAW.
There are plenty of options to choose from these days, including plugins like IK Multimedia’s Amplitube, Native Instruments’ Guitar Rig, Bias Amp, or any other that you might like.
There are many tutorials and demos online, so it’s pretty easy to find what suits your needs.
These amp simulators also include different digital pedal replicas, and you can make your custom signal chain.
But if you prefer using your pedals, it’s a good idea to use some of the digital amp simulations to make things more versatile.
This is one of the best ways to make your tone as realistic as possible, as pedals on their own through an audio interface might sound a bit “dry” and sterile.
This is because audio interfaces and DAWs are designed to have a somewhat “flat” frequency response all over the audible spectrum.
Guitar amps, on the other hand, are designed to pronounce all the desirable parts of the spectrum, most notably the mids.
And this is exactly what these amplifier simulators are aiming for as well.
What’s more, some of the simulators do a great job of replicating the much-appreciated warmth of tube amps, including their dynamic response.
It’s essential to choose the right amp for your desired tone or style of music. There are plenty of free amp simulators to choose from these days.
However, they might lack the much-needed pedal simulations, so using your physical pedals will come in handy.
Recording Direct vs Recording a Real Amplifier
When recording guitars in your home studio, you can either record them directly in the audio interface, along with all the pedals or you can record an amp using a microphone.
Now we’ll see what the advantages and disadvantages of these two approaches are.
Recording direct
Pros:
- It’s way easier to set up. You don’t need to bother with any microphones and room acoustics, so you’ll save up a lot of time.
- You’ll have a lot of flexibility. Amp simulators offer many different digital models of some famous amps.
Cons:
- Recording an amp simulator might not give the true tube amp tone. Although they’re getting more realistic as time goes by. Many of the free amp simulators might not be the best setting for those who are very fond of vintage-vibe guitar sounds.
- It’s sometimes hard to deal with clipping when recording directly with your pedals. In some cases, you’ll either need to use a DI box or any pedal that has an additional output for mixers.
Recording a Physical Amplifier
Pros:
- You’ll be able to get a more realistic tone when recording your amplifier with a microphone. Especially if you have a tube amplifier and a good set of mics.
- If you have an audio interface with two or more channels, you can use more microphones and more individual channels for recording your amp. This opens up some flexibility when it comes to capturing your room’s acoustics.
Cons:
- Miking up your amplifier might be a bit too tricky in some cases. Mostly because it requires good room acoustics.
- You’ll need to have a good microphone or a set of microphones for this. It’s not recommended that you use any kind of a cheap computer or vocal mic for the process.
Related Questions
Can you use guitar pedals for vocals?
Yes, you can use guitar pedals for vocals. However, guitar pedals are designed to enhance the mid frequencies of a guitar and not intended for manipulation of vocals. It also depends on the type of microphone you are using as various microphones react differently to guitar effects.
Can I plug my guitar directly into my computer?
You can connect your guitar to your computer soundcard using a 1/4 inch stereo jack to 3.5mm stereo adapter. However, an audio interface is designed for receiving instrument inputs and processes instrument signals to a higher standard. It also has very low latency compared to a computer soundcard.
Check Out Another Post
Ever pondered the differences between cheap and expensive guitar pedals?
For the answer… check out my post “Cheap vs Expensive Guitar Pedals”
Learn the differences in price, quality, tone, reliability and how to best utilize budget pedals.